
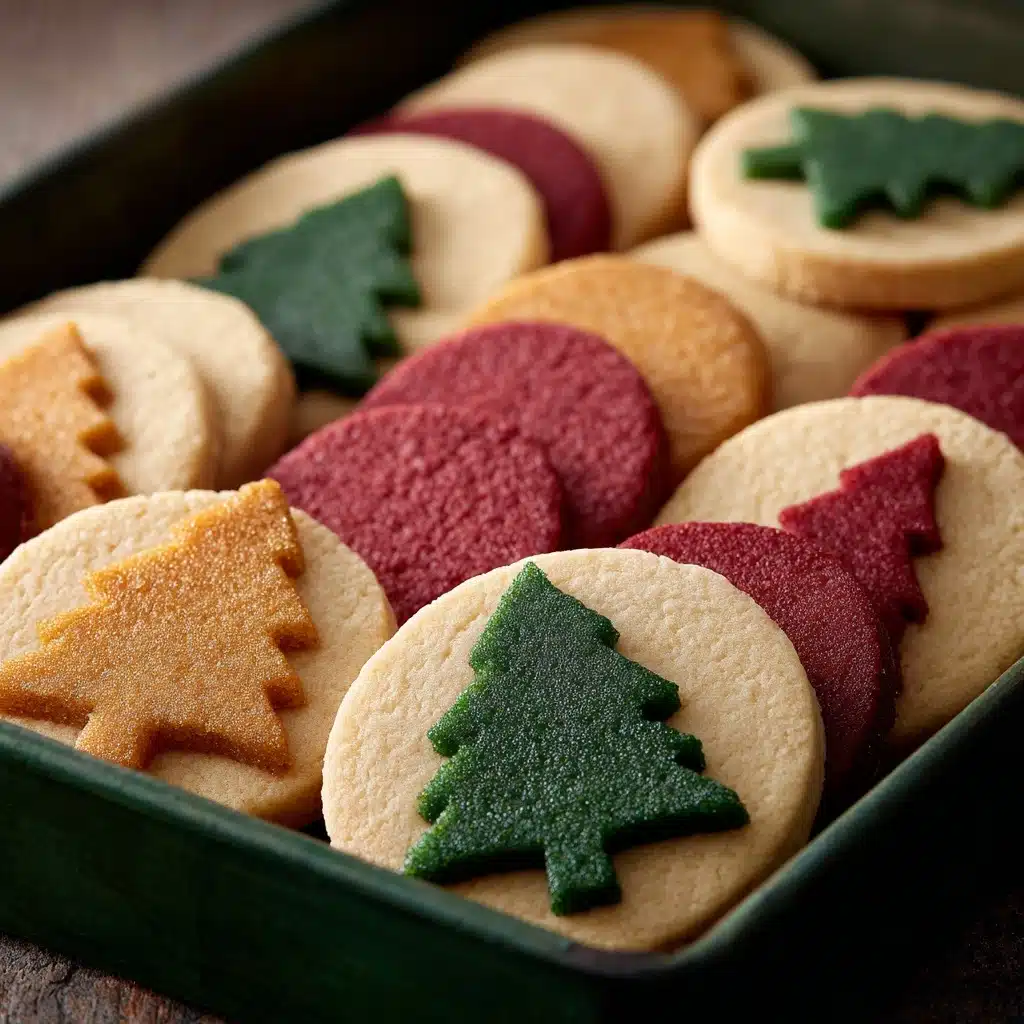
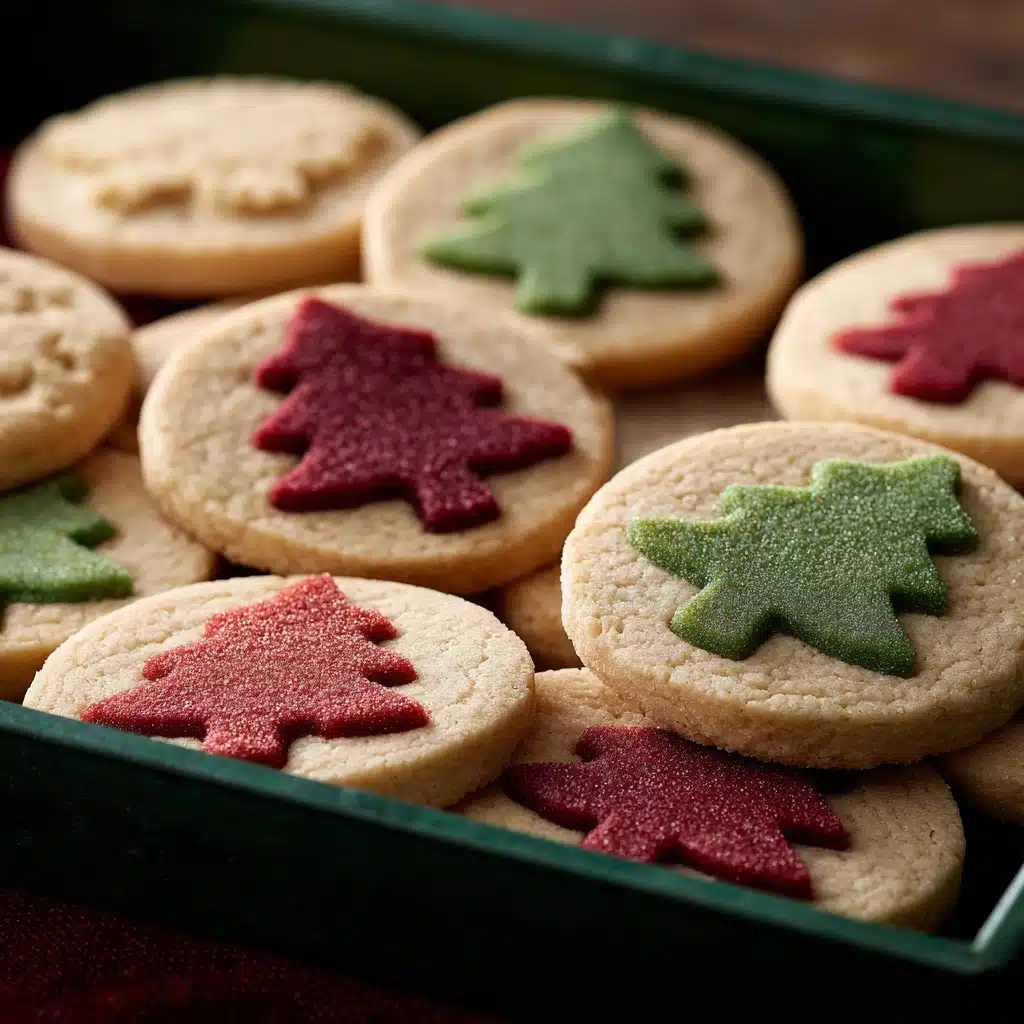
Slice and Bake Christmas Cookies Recipe
There is something truly magical about the simplicity and charm of classic holiday treats, and these Slice and Bake Christmas Cookies capture that festive spirit perfectly. With tender, buttery dough featuring a playful pop of color and whimsical shapes, these cookies are as fun to make as they are to eat. Whether you’re gathering with loved ones or packing sweet gifts, this recipe brings a nostalgic warmth and joyful charm to your holiday celebrations.
Ingredients You’ll Need
Ingredients You’ll Need
These ingredients are straightforward but absolutely essential for creating the perfect balance of flavor, texture, and visual delight. Each element contributes thoughtfully: flour forms a tender structure, butter adds richness, eggs bring moisture and lift, and vanilla imparts that unmistakable comforting aroma.
- 2 1/2 cups all purpose flour: Use spooned and leveled flour for accurate measurement ensuring perfect dough texture.
- 1 cup granulated sugar: Sweetens the dough just right without overpowering its buttery base.
- 3/4 cups unsalted butter, softened: Provides rich flavor and tender crumb, so soften to room temperature for smooth mixing.
- 2 large eggs: Bind ingredients together and add moisture to the dough.
- 1 teaspoon baking powder: Gives a gentle lift, keeping cookies light and soft.
- 1 teaspoon vanilla extract: Adds warmth and depth, that classic cookie aroma everyone loves.
- 1/2 teaspoon kosher salt: Enhances flavor balance and counters sweetness.
- A few drops of food coloring (gel or natural): Bring a festive pop of color to some of the dough, making your cookies merry and bright.
How to Make Slice and Bake Christmas Cookies
Step 1: Cream Butter, Sugar, and Vanilla
Start by beating the softened butter with sugar and vanilla extract until the mixture becomes light and fluffy—this aeration creates a tender, melt-in-your-mouth cookie. It usually takes about 3 minutes at medium speed, so be patient and let your mixer do the magic.
Step 2: Incorporate the Eggs
Next, add eggs one at a time, mixing just until they’re combined. This gentle folding keeps the batter smooth without deflating the air you whipped in during creaming.
Step 3: Combine Dry Ingredients
In a separate bowl, whisk together the flour, baking powder, and kosher salt. This step ensures the leavening is evenly distributed and that the salt doesn’t clump.
Step 4: Blend Dry Into Wet Ingredients
Add the flour mixture in 3-4 batches to your wet ingredients, mixing carefully until the dough forms. The dough should feel pliable but not sticky. If using natural food coloring, you might need to add an extra tablespoon or two of flour to get the right consistency.
Step 5: Color One Portion of Dough
Take about one-third of the dough and place it into a new bowl, then add a few drops of your chosen food coloring. Mix until the color is evenly distributed. This colorful dough will add cheer once sliced and baked.
Step 6: Chill and Roll Colored Dough
Pop the colored dough into the freezer for 5-10 minutes to firm it up a bit, then roll it out on a lightly floured surface into a 1/2-inch thick rectangle. Return it to the freezer for 30 minutes. Cooling makes it easier to cut shapes without crumbling.
Step 7: Cut and Assemble Shapes
Use a small cookie cutter about 1.5 inches across to cut shapes from the colored dough. Lightly wet the edges of the cut shapes with your finger dipped in water to help stick them together into a log that measures about 10 inches long. This step adds a fun dimension to your cookies.
Step 8: Freeze the Cookie Log
Freeze the assembled log for at least 2 hours until solid. Many bakers find it easiest to prepare this step ahead of time and freeze overnight.
Step 9: Encase the Colored Shapes
Remove the solid log from the freezer and gently press plain dough around and onto the colored shapes to fully encase the designs. Press firmly to avoid gaps, but leave ends open so you can check how much dough remains for an even outer layer. Then, roll gently into a smooth log on a floured surface.
Step 10: Chill the Log
Wrap the dough log tightly in plastic wrap and chill in the refrigerator for at least 30 minutes before baking. This resting time helps flavors meld and dough firm up.
Step 11: Bake Your Slice and Bake Christmas Cookies
Preheat your oven to 350˚F and line two baking sheets with parchment paper. When ready, slice the dough into 1/4-inch rounds and place them spaced 2 inches apart on your prepared pans. Bake for around 12 minutes, or until the cookie bottoms turn a lovely light golden brown. Let cool before enjoying or packaging.
How to Serve Slice and Bake Christmas Cookies
Garnishes
These cookies are charming enough on their own, but a light dusting of powdered sugar or a drizzle of melted white chocolate adds an elegant snowy touch. Sprinkles in festive colors can be pressed gently on before baking for extra cheer and crunch.
Side Dishes
Pairing these cookies with rich hot cocoa, creamy eggnog, or a spiced chai tea creates a comforting holiday pairing that feels both nostalgic and indulgent. They also go splendidly with fruit preserves if you want a sweet contrast.
Creative Ways to Present
Slice and Bake Christmas Cookies are perfect for gifting — slice and arrange them attractively in decorative tins or cellophane bags tied with a festive ribbon. You can even use cookie slabs as charming edible place cards for holiday dinners by slicing and garnishing with mini name tags or edible markers.
Make Ahead and Storage
Storing Leftovers
Store leftover cookies in an airtight container at room temperature for up to one week. This keeps them tender but still delightfully crisp on the edges. Be sure to separate layers with parchment paper to avoid sticking.
Freezing
You can freeze the dough log wrapped tightly in plastic wrap and a freezer bag. When ready, slice and bake straight from frozen adding a minute or two to the baking time. Cookies themselves freeze well too — just thaw at room temperature before serving.
Reheating
To refresh older cookies, pop them in a warm oven (300˚F) for 3-5 minutes to regain a freshly baked crispness. Avoid microwaving as it can make them chewy.
FAQs
Can I use different food coloring types?
Absolutely! Both gel and natural food colorings work well. Just remember natural dyes might slightly change the dough’s moisture, so adjust flour as needed for consistency.
How do I prevent the cookies from sticking when slicing?
Chilling the dough log thoroughly and using a sharp knife is key. You can also dip your knife in warm water between cuts to slice smoothly without stretching or sticking.
Can I add flavors other than vanilla?
Definitely! Almond extract, peppermint, or citrus zest all make festive twists that complement the buttery dough beautifully.
Is it necessary to freeze the log multiple times?
Freezing between steps helps maintain shape and makes cutting easier, but if you’re short on time, one extended freeze before baking can work—just handle the dough gently.
How long do these cookies stay fresh?
Stored properly at room temperature, these cookies remain delicious for up to a week. For longer storage, freezing is your best bet.
Final Thoughts
There’s nothing quite like the joy that fresh, homemade cookies bring during the holidays. This Slice and Bake Christmas Cookies recipe fills your kitchen with cheerful aromas and delivers that perfect balance of festive fun and classic flavor. Give it a try and watch your friends and family light up with every colorful, buttery bite. Happy baking and happy holidays!
Print
Slice and Bake Christmas Cookies Recipe
- Total Time: 3 hours 7 minutes
- Yield: Approximately 36 cookies 1x
- Diet: Vegetarian
Description
These Slice and Bake Christmas Cookies are a festive and fun holiday treat featuring a colorful pattern inside each bite. The dough is rolled, colored, and shaped into a log that is sliced and baked to golden perfection, making them perfect for gifting or enjoying with family during the holiday season.
Ingredients
Dough Ingredients
- 2 1/2 cups all purpose flour (spooned and leveled)
- 1 cup granulated sugar
- 3/4 cup unsalted butter, softened to room temperature
- 2 large eggs
- 1 teaspoon baking powder
- 1 teaspoon vanilla extract
- 1/2 teaspoon kosher salt
Additional Ingredients
- A few drops of food coloring (gel or natural)
Instructions
- Cream Butter and Sugar: Add butter, sugar, and vanilla extract to a large mixing bowl or stand mixer. Beat at medium speed until the mixture is light and fluffy, about 3 minutes, creating a smooth base for your cookies.
- Add Eggs: Incorporate the eggs one at a time, mixing each just until combined to maintain a smooth consistency.
- Combine Dry Ingredients: In a separate bowl, whisk together the all-purpose flour, baking powder, and kosher salt to evenly distribute the leavening agent and salt.
- Mix Dry and Wet Ingredients: Gradually add the dry ingredients to the wet mixture in 3 to 4 batches. Stir until the dough comes together, adding 1 to 2 tablespoons more flour if the dough feels too wet, especially if using natural food coloring.
- Color the Dough: Remove about 10 ounces (about one-third) of the dough into a separate bowl. Add several drops of food coloring and mix thoroughly until uniformly colored.
- Chill and Shape Colored Dough: Place the colored dough in the freezer for 5 to 10 minutes to firm up. Then roll it into a 1/2-inch thick rectangle on a lightly floured surface. Freeze again for 30 minutes to make cutting easier.
- Cut Shapes and Assemble: Using a small cookie cutter roughly 1.5 inches across, cut shapes from the colored dough. Lightly wet the floured side of each cutout with a fingertip dipped in water to help them stick when sandwiching two shapes together. Repeat until you have a log approximately 10 inches long.
- Freeze the Log: Freeze the assembled log for 2 hours or until solid. This can also be done overnight.
- Wrap with Plain Dough: Remove the log from the freezer and press plain cookie dough around the shapes carefully, ensuring there are no gaps. Roll the entire log into a smooth cylinder on a lightly floured surface, leaving the ends open to help maintain an even circle.
- Chill Log: Wrap the log tightly in plastic wrap and chill in the fridge for at least 30 minutes to firm up before slicing.
- Preheat Oven and Prepare Baking Sheets: Preheat your oven to 350°F (175°C) and line two baking sheets with parchment paper to prevent sticking.
- Slice and Bake Cookies: Slice the chilled dough into 1/4 inch rounds, spacing them 2 inches apart on the baking sheets. Bake for about 12 minutes, or until the bottoms are lightly golden brown.
- Cool: Remove from the oven and allow the cookies to cool completely on the baking sheets before serving or storing.
Notes
- If the dough is too sticky to work with, refrigerate it for an additional 15-20 minutes before rolling out.
- Natural food coloring may require a bit more flour to maintain dough consistency.
- The log can be prepared a day ahead and frozen overnight to save time on baking day.
- Use a sharp knife for clean slices to maintain cookie shape.
- Store baked cookies in an airtight container at room temperature for up to one week.
- These cookies are perfect for decorating or gifting during the holidays.
- Prep Time: 25 minutes
- Cook Time: 12 minutes
- Category: Dessert, Cookies, Holiday Treat
- Method: Slice and bake
- Cuisine: American
Nutrition
- Serving Size: 1 cookie (approximate)
- Calories: 110 kcal
- Sugar: 7 g
- Sodium: 65 mg
- Fat: 6 g
- Saturated Fat: 3.5 g
- Unsaturated Fat: 2 g
- Trans Fat: 0 g
- Carbohydrates: 13 g
- Fiber: 0.5 g
- Protein: 1.2 g
- Cholesterol: 25 mg
Keywords: slice and bake cookies, Christmas cookies, holiday cookies, colorful cookies, easy holiday treats, festive cookies


